How to Make a Paper Bird in Origami
Par: creator
Origami has always fascinated me. With nothing more than a square sheet of paper, you can create animals, flowers, or even tiny works of art. One of the easiest and most beautiful origami creations is the paper bird. It’s simple, fun, and a great way to bring creativity into your day.
Here’s how you can make one:
What You Need
A square sheet of paper (any color you like)
A flat surface to fold on
A little patience and curiosity
Steps to Make a Paper Bird
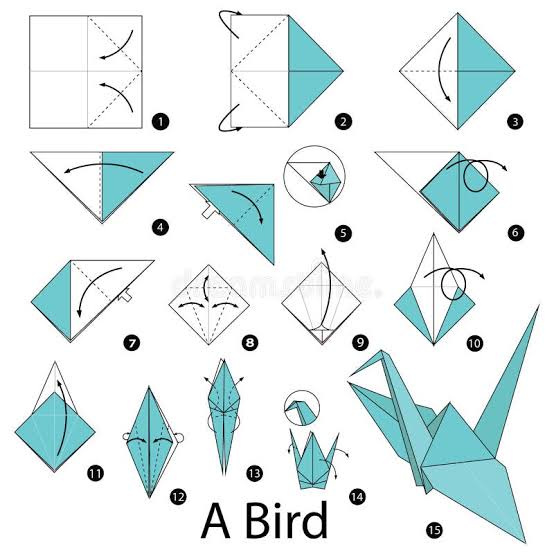
1. Start with a square paper. Place it in a diamond shape (like a kite) with one corner pointing up.
2. Fold it in half diagonally. You’ll get a triangle. Crease it well and open it back up.
3. Fold it diagonally the other way. Another triangle, another crease. Now your paper has an “X” crease.
4. Collapse into a square base. Bring two sides together along the creases so it folds into a smaller square.
5. Form the bird base. Fold the lower edges of the square up to the center line, then fold the top triangle down. Open everything back up and lift one flap upwards—it forms a long diamond shape. Do the same on the other side.
6. Create the neck and tail. Take one of the thin flaps and fold it upward—this will be the bird’s neck. Fold the other flap the opposite way for the tail.
7. Make the head. At the tip of the neck, fold a small portion down to form the beak.
8. Shape the wings. Fold down the top flaps on both sides, and suddenly you’ll see your bird with open wings.
And You’re Done!
With just a few folds, your flat sheet of paper has transformed into a little bird. You can make several in different colors, hang them as decorations, or even gift them to someone as a symbol of peace and creativity.
Origami isn’t just about paper—it’s about patience, imagination, and the joy of creating something with your own hands.
Commentaires
Publiez vos pensées